Showing posts with label packaging. Show all posts

Thursday, May 16, 2019

Handstamped Pouch for Jewelry


The linen pouch that I ordered had arrived, I had been using a muslin drawstring bag since forever and I never ask myself if anybody would like it. Recently a friend who love my jewelry and had bought a lot of them had brought to my attention that she would prefer that if the bag is a little bit more solid. oops. Always have room to learn, right? 


I scour the web to find a vendor and finally found the one with the best price quality ratio, a vendor from Etsy! yaay! I don't want to be bias but I love shopping on Etsy. First because almost all of the seller is always friendly, they always reply to your (even the stupidest) question, I do ask questions and ask for special requests, sorry you guys I am your choosy client.  But this also means that I can appreciate and can understand that some client of mine can be choosy and picky, because I recognise one when I meet one. hehe. And, back to why I love shopping on Etsy, since I am familiar with the platform, I know exactly where to find the terms and condition.

There are two sizes 8x10cm and 10x12cm, because some of my hoop can be too big and can't fit into the 8x10cm pouch. They came in natural color, I had imagined that it would be a bit thinner and more flexible though, but they are a bit rigid, it is obvious that it isn't washed before. But it's alright I prefer it that way. 

So just like the old bag, I want a personalised stamp on it. like on the old pouch I stamped a big red ribbon in front of every pouch. But this time I want to do it differently, so I made myself a little ribbon and a heart handmade stamp made out of an eraser. 


And here goes the result!


I had SOOO MUCHH fun doing this, and forgot when was the last time I had fun, seriously. So I made more and each one is different from the other :D 


Almost forgot, this is the ink I am using

VoilĂ . I know that I don't give you the detail on how to do the stamp, but if you are interested please ask me. I'll be more than happy to show you how to do it. Or you can also youtube it. So many tutorial about it. :) Have a good day ! 

Thursday, August 01, 2013

Stamped Drawstring Muslin Bag Packaging

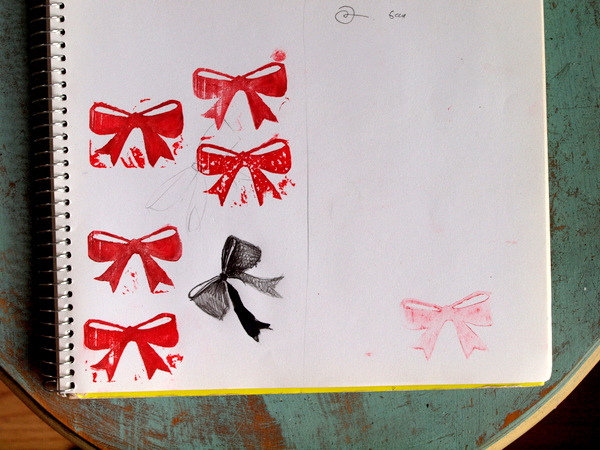
Inspired by Olivsteen's work I shared on the previous post and the urge to redesign a new packaging. I've created a stamp. This is how it looks like from underneath.


Instead of using linoleum like how Olivsteen does with his work (of course I dare not to compare myself with a maestro) I did the gravure from an old eraser.  Doodle the image on a piece of paper, copy it on to the old eraser, first with a pencil and then trace it with a pen for more visibility, and cut off the area you didn't want the ink on with a cutter.


Above are the test after the cutting.  The top left ribbon is the first attempt, if you see it the right tail of the ribbon is a bit fatter than the right one. 


This red ribbon will be stamped on a drawstring muslin bag, thus will replace my existing packaging.


Nothing wrong with the old packaging really. I even like it; designed and created it myself, but the problem is that the production time sometimes takes longer than the creation of the jewelry by itself.  Discussed it with the fellow Handmade Europe, and indeed some of the seller fellow thought that there's something wrong with this packaging, timewise it's obviously less efficient. So until I can find a good supplier who can product the paper packaging for me, I'd have to say au revoir. Not forever I hope.

Did some research on the drawstring muslin bag and found a decent supplier on etsy, what I mean decent is it has a good price / quality ratio. Purchased it, arrived and quite happy with the quality.  It absorbs well the fabric ink too. Let me know if you want to know who my supplier is, I don't get any commision for this, but I feel like helping here ;)

Alright, well... If you like my idea and decided to make the same thing, you're so welcome to send me the picture of your finished product or just leave a message after this article. If you don't like my idea (hei it happens) please let me share my board titled 'packaging' I've created awhile ago from pinterest here you'll see different style of packaging, maybe you fall into one that you like the best.

Wednesday, December 12, 2012

Simple Gesture to Make a Christmas Present Special


This holiday season I wanted to make something special for my customers on Les Bijoux de Siany.  While staying on a low budget, I know rightaway that, following my nature, it should be something crafty and DIY. Thus, was born a rustic red christmas tree on top of (my) handwriting.

You've probably guessed how to do this, but I'll just share anyway. Ready? Go.  You need an old eraser that you don't wish to use anymore, a cutter, a red inkpad, and a green pen.

On the old eraser draw a simple design you like, it can be a chrismas tree (like mine), snowflakes, mistletoes, santa's hat, socks, or candy cane.  I don't recommend cat, dog, or parkeets though, I know you might love your dog or cat very much, but then the receiver of your christmas present might not know that it's actually a christmas gift. If you insist on having an animal, reindeers might work better.


Then cut off the sides and dip it in the inkpad. Mine is red but you can definitely do whichever color you'd like. Green is perhaps also nice, since most of the christmas trees are green :) 


Here's the detail photo maybe it'd help you to see how it is cut. 


I use a cutter, but if you have a carver at home it might work better, your design might be more detail and prettier than just a simple triangle tree. 


So what do I do with it? 

I stamp it on any paper, cut them, and wrote "Joyeux Noel" to make sure the message delivered. 


Then I hole-punch the corner and attached it on the package. 


Like this! 


Like it? Do you do something special on packing your holiday gift? I'd like to know.